How to install and configure the AEM Plugin
The Siteimprove AEM CMS plugin is a CMS Plugin used specifically with the Adobe Experience Manager (AEM) Content Management System (CMS) environment. The plugin works like a small version of the Siteimprove Intelligence Platform that, after installation and configuration, appears in an overlay within the AEM CMS environment and informs users about data and issues related to the page they're working on in the CMS.
The standard plugin shows data from the Siteimprove platform for the live published pages that are scanned in the Siteimprove Platform. The Siteimprove AEM CMS plugin has the added advantage of Siteimprove’s Prepublish (Content) check functionality, which allows users in the AEM CMS to check for certain content issues before publishing. With version 3 and later of the plugin that has the “Latest Plugin Experience,” there is also the ability to do Prepublish checks within Adobe Experience Fragments. You can read more about this here: Prepublish content check: How to ensure quality content on your site.
NOTE: You’ll need a Siteimprove subscription to Prepublish to use the feature. Contact Siteimprove if you have any questions regarding your subscription. You can use the plugin without the Prepublish feature; you just won’t be able to check content before being published in the CMS.
TABLE OF CONTENTS
- Prerequisites for Installation
- Installation
- Post-Installation Tasks and Configuration
- Plugin Configuration
- User permissions to see the plugin
- Technical details
- Usage
- Troubleshooting
Prerequisites for Installation
There are several things you need to and can do ahead of installing the plugin to ensure that the plugin is installed and configured more easily.
- Ensure you have Java 11+ with your AEM authoring environment to install version 3.0.3+ of the plugin
- Ensure that you have the proper resources to set up the plugin
- Ensure you are scanning the site you are installing the plugin on in the Siteimprove Platform
- Ensure that the plugin is not blocked (optional)
- If using the Prepublish feature, create an API key (optional if not using Prepublish)
Ensure you have Java 11+ with your AEM authoring environment to install version 3.0.3+ of the plugin
After version 3.0.3 of the AEM CMS plugin, Java 11+ is required on the AEM authoring environment on which the plugin is installed. This aligns with Adobe’s recommended runtime environments and current security standards. Our ongoing development and support efforts are focused on Java 11+ to ensure optimal performance, compatibility, and security.
If you are running Java 8 on the 6.5 On-Prem version of the plugin, we do provide version 3.0.14 of the plugin, which provides the same functionality as version 3.0.13. This version is provided for legacy compatibility purposes and is not expected to receive further updates unless critical issues arise.
Ensure that you have the proper resources to set up the plugin
You will need to ensure that someone has Account Owner level access to the Siteimprove platform. They will need to be the first to login to the plugin via the overlay once installed to approve the terms and conditions of the plugin.
Admin-level access to the AEM authoring environment and related resources is needed to install and configure the plugin. It is recommended that you have resources on your end that have expertise or training with the Siteimprove Platform and, more importantly, expertise with the AEM platform at the Admin level. Siteimprove doesn’t have the resources to walk you through the steps of installation and configuration of the plugin.
Ensure you are scanning the site you are installing the plugin on in the Siteimprove Platform
Make sure that the CMS site you are installing the plugin on is set up as a site being scanned in the Siteimprove platform (not a local environment), even if you are just testing the plugin out.
You will need to scan the publisher (live) pages and not the authoring (editing) pages. If the site is not being scanned, you can add the site to be scanned by following these steps: Adding a Site (Tips & Tricks). Even if you plan to use the plugin mainly for Prepublish checks, you still need to install the standard plugin that checks against published content in the Siteimprove platform as well.
If you want to test the plugin on a test environment first, please reference this article for steps to do so: How to test the Siteimprove CMS Plugins. For testing the plugin, it is best practice to scan published pages for a non-production site. Do not test on a local environment (i.e., local to your machine only) for which the live published version of the pages cannot be crawled, as it will not be a good test of the plugin functionality. There are options to scan non-public sites, like allowing the IPs and User Agents used by Siteimprove or setting up a login site outlined here: Can Siteimprove crawl an intranet and other non-public sites?.
Ensure that the plugin is not blocked (optional)
This is marked as optional, as you may want to install the plugin first and then, if you run into issues, ensure that the plugin is not blocked by the things mentioned below. If you want to head things off and ensure no issues arise ahead of installation, though, it may be good to take this into consideration ahead of time.
If you have network firewalls, Content Security Policies (CSP), Cross-origin resource sharing (CORS) policies, or other programs used with the site/browser that could block network requests made by the plugin, it is a good idea to ensure that the domains used by the plugin are not blocked.
Incognito browser windows, browser extensions that block ads or pop-ups, and third-party cookie blocking in your browsers are all things that can block the plugin from working as expected as well. The plugin requires third-party cookies for the login, and it could be seen as an ad-like pop-up, so it is best to ensure these things are not used with the plugin, or you may encounter issues with the plugin.
Domains allow for the CMS Plugin:
- Overall (if wildcards are allowed):
- *.siteimprove.com
- *.siteimproveanalytics.com
- *.siteimprove.net
- *.siteimproveanalytics.io
- More Specific:
- id.siteimprove.com (old login)
- identity.siteimprove.com (new login)
- sso2.siteimprove.com
- my2.siteimprove.com
- help.siteimprove.com
- cdn.siteimprove.net
- EU Datacenter only:
- api.siteimprove.com
- contentassistant.eu.siteimprove.com
- id.eu.siteimprove.com (old login)
- ap.eu.siteimprove.com (login account picker for EU DC)
- US Datacenter only:
- api.us.siteimprove.com
- contentassistant.us.siteimprove.com
- id.us.siteimprove.com (old login)
- ap.us.siteimprove.com (login account picker for US DC)
If using the Prepublish feature, create an API key (optional if not using Prepublish)
Follow How to connect to the Siteimprove API to set up an API key. This API key will be used in the installation process to set up the Prepublish feature.
NOTE: It is best practice to set up a user account that is generic and not user-specific, like one called “Siteimprove User,” for example, so that specific user changes don’t impact the connection. See How do I add a user? for how to set up the Siteimprove user portion of this. A user like this can be helpful to have set up to be used with other integrations as well, for the same reason. It is up to your organization to create and manage this user within your CMS or organization.
Installation
Download the plugin files
Download the plugin package that corresponds to your version of AEM below. Then follow the steps to install and configure the plugin on the corresponding version of your AEM CMS “Authoring” environment, Cloud or Non-Cloud (On-Prem).
- AEM Cloud Service - for the Cloud version of AEM
- AEM 6.4 - for AEM 6.4 on Prem or local server installations
- AEM 6.5 - for AEM 6.5 on Prem or local server installations
- AEM 6.5 for Java 8 - For customers who continue to run AEM on Java 8, we offer a Java 8-compatible build for AEM 6.5, version 3.0.14, which provides the same functionality as version 3.0.13. This version is provided for legacy compatibility purposes and is not expected to receive further updates unless critical issues arise.
- AEM for Universal Editor
Installing the Plugin on the Cloud Version of AEM
For the Cloud version of AEM, follow this guide to install the plugin: How to install CMS Plugin for AEM Cloud. Then follow the rest of the installation steps after the package installation here: Post Installation Tasks and Configuration as they apply to your environment.
Installing the Plugin for Universal Editor
The Universal Editor (UE) integration allows users to seamlessly leverage the Siteimprove CMS Plugin within the AEM Universal Editor in their AEM environment.
For configuration and installation, reference the AEM Universal Editor PDF Guide.
Installing the Plugin on Non-Cloud (On-Prem) Versions of AEM
For Non-Cloud versions 6.4 and 6.5, package installation there are 2 different ways it can be installed: with Package Manager or via Curl Installation. Follow the steps below for the way you want to install the package.
Installation with Package Manager
- Go to AEM Package Manager (https://YOUR_ENVIRONMENT_DOMAIN/crx/packmgr/index.jsp):
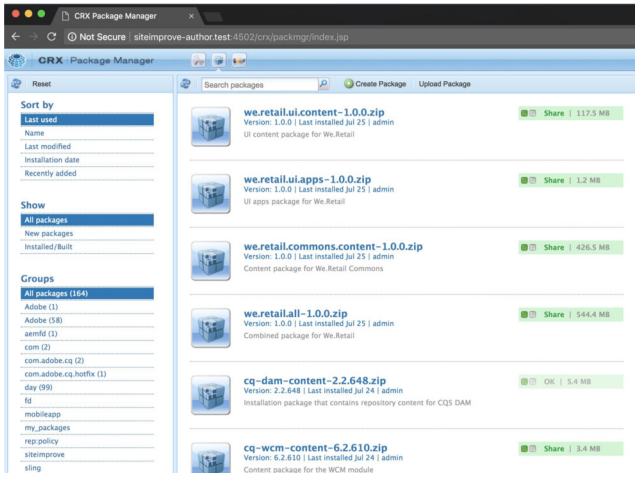
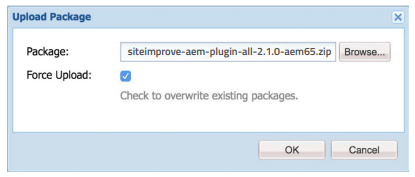
- Click on “Upload Package” and select the Siteimprove plugin package matching your AEM version that can be downloaded here: https://www.siteimprove.com/integrations/cms-plugin/adobe-experience-manager/
- Click “OK.”
- Afterwards, you will see the uploaded package.
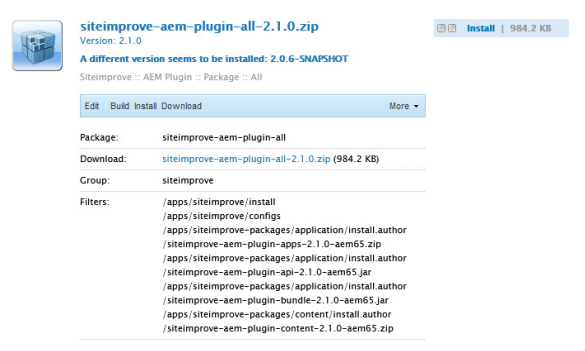
- Clicking on “Install” shows a dialog, where you click again on the “Install” button.
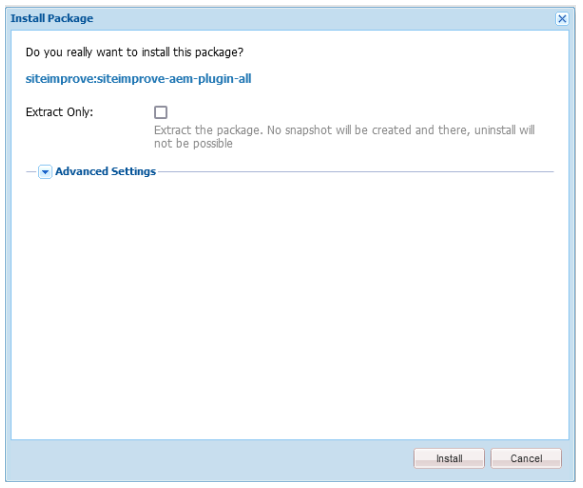
- Check the activity log; it should not display any errors.
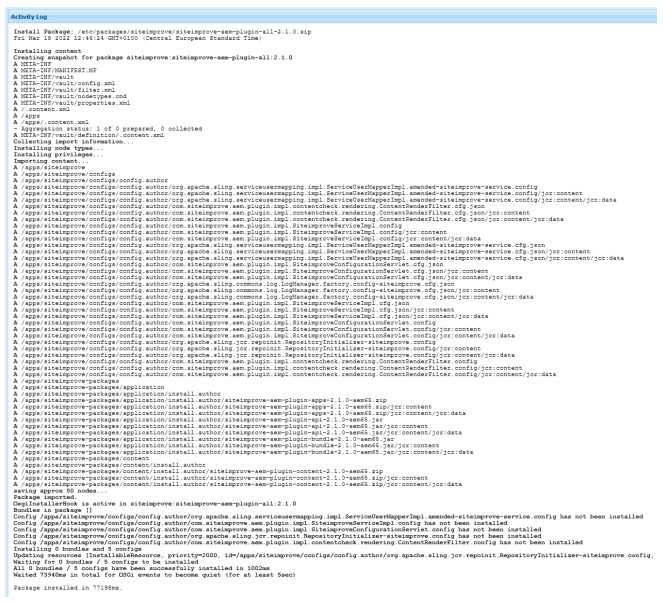
- Proceed to the Post Installation Tasks and Configuration section.
Curl Installation
The package can also be installed via curl:
For AEM 6.4 use (replace the plugin zip file with the most recent plugin version zip file):
curl -u admin:admin \
-F file=@”siteimprove-aem-plugin-all-2.1.0-aem64.zip” \
-F name=”siteimprove-aem-plugin-all-2.1.0-aem64.zip” \
-F force=true \
-F install=true \
http://localhost:4502/crx/packmgr/service.jsp
For AEM 6.5 use:
curl -u admin:admin \
-F file=@”siteimprove-aem-plugin-all-2.1.0-aem65.zip” \
-F name=”siteimprove-aem-plugin-all-2.1.0-aem65.zip” \
-F force=true \
-F install=true \
http://localhost:4502/crx/packmgr/service.jsp
After installation via curl, proceed to the Post-Installation Tasks and Configuration section.
Post-Installation Tasks and Configuration
Flush files in the dispatcher module
If you are using the dispatcher module for your authoring instance, please make sure that you flush the following files under the dispatcher module after installation. If you don’t have a dispatcher module, then this may not apply.
- No minification activated
- /libs/cq/gui/components/authoring/editors/clientlibs/sites/page.css
- /libs/cq/gui/components/authoring/editors/clientlibs/sites/page.js
- Minification activated
- /libs/cq/gui/components/authoring/editors/clientlibs/sites/page.min.css
- /libs/cq/gui/components/authoring/editors/clientlibs/sites/page.min.js
NOTE: Flushing these files needs to be done by an Admin in AEM with dispatcher access and expert knowledge of how to flush files in the dispatcher. These files will only exist in the dispatcher to be flushed and may not be found in the regular directories.
Verify plugin paths exist in the repository
Verify that the paths shown in the filter of “siteimprove-aem-plugin-package” exist in the repository. If they do not exist, you need to verify your customizations do not override these paths.
Plugin Paths:
- /apps/granite/ui/content/globalhead/siteimprove
- /apps/wcm/core/content/editor/jcr:content/content/items/content/header/items/headerbar/items/toggleContentCheck
- /apps/wcm/core/content/editor/jcr:content/content/items/content/header/items/headerbar/items/siteimprovePlugin
- /apps/wcm/core/content/editor/jcr:content/content/items/content/content/items/ siteimprovecontentcheckresult
- /apps/wcm/core/content/sites/jcr:content/actions/selection/unpublishCheck
OSGI Plugin Configuration
Optionally, under OSGI Configuration (/system/console/configMgr), you can configure some things under the Siteimprove Service Configuration: “Siteimprove :: AEM Plugin :: Siteimprove Service configuration.” Some things that can be configured here are listed below, along with a description of why you may want to adjust the configuration.
Additional HTTP headers
Custom HTTP headers to be added to every server-side call to the Siteimprove servers. Headers should be entered in the format <header name>:::<header value>.
Connect timeout and Socket timeout
There are default timeouts set up in these fields that should work with the standard plugin and Prepublish setups. These may need to be adjusted, though, if API customizations with the Prepublish (Content Check) run into timeout issues. Note: that the times are in milliseconds.
Disable New UI Version
By default, the “New Plugin Experience” or User Interface (UI) is set up with the most recent versions of the plugin (3.0.0 and after), but if you choose to, you can check the box here and save the changes to revert to using the “Old Plugin Experience.” Both versions of the plugin UI exist currently due to support of some features still being built out, and as many of the plugins are in the process of being migrated to use the New Plugin Experience.
There are steps to do this listed here as well: How to Disable the New Plugin Experience.
You can read more about each experience with the articles corresponding to each version here:
You may decide to revert to using the “Old Plugin Experience” to retain access to features that are being built out, or if you run into issues with the new experience that don’t exist with the “Old Plugin Experience.”
- New things in the “New Plugin Experience:”
- For AEM Experience Fragment Prepublish checks are supported.
- User roles are connected better to the roles in the platform.
- Sticky selection for filter options under “List View.”
- Uses SDK and different request URLs.
- Branding continuity between the Siteimprove Platform and the Plugin
- Deprecated Features in the “New Plugin Experience:”
- Site overview and Content check history.
- Analytics data – possibly coming later.
- SEO data – most of the SEO data is available upon request, except for Activity Plan and Keyword data. Reach out to Siteimprove Customer Support to get this set up.
- URL Shortener data.
Plugin Configuration
The plugin uses Cloud Configurations that need to be set up and applied to the directories that you want to make the plugin available on. There are also specific configurations to enable the Prepublish feature if you are using that feature of the plugin. Steps to configure the plugin are listed below.
NOTES:
The main goal of setting up these plugin configurations is to get what the plugin is requesting for URLs under browser network requests to match the URLs being crawled in the Siteimprove platform. See the article CMS Plugins: How-to locate CMS ‘plugin request URLs', as this can be helpful to learn more about the request URLs made by the plugin.
You can add more than one plugin configuration if there are multiple sites under the AEM authoring environment that need different setups, as they may have different domains or different URL pattern scenarios.
These “Cloud Configurations' are applied to the directories under the “Sites Console” that you want to make the plugin available on. These “Cloud Configurations” are applied to the directories using the “Plugin Active Paths” tab under the plugin configuration and under Page Properties > Cloud Configurations. It is best to apply the configurations to the root or top-most directory that you want to apply them to, as the configurations will be inherited top-down from the higher-level directory to the ones below it. There are some circumstances where you may need to override this and apply different configurations, though if URL structures differ for pages or directories below the top-level directory.
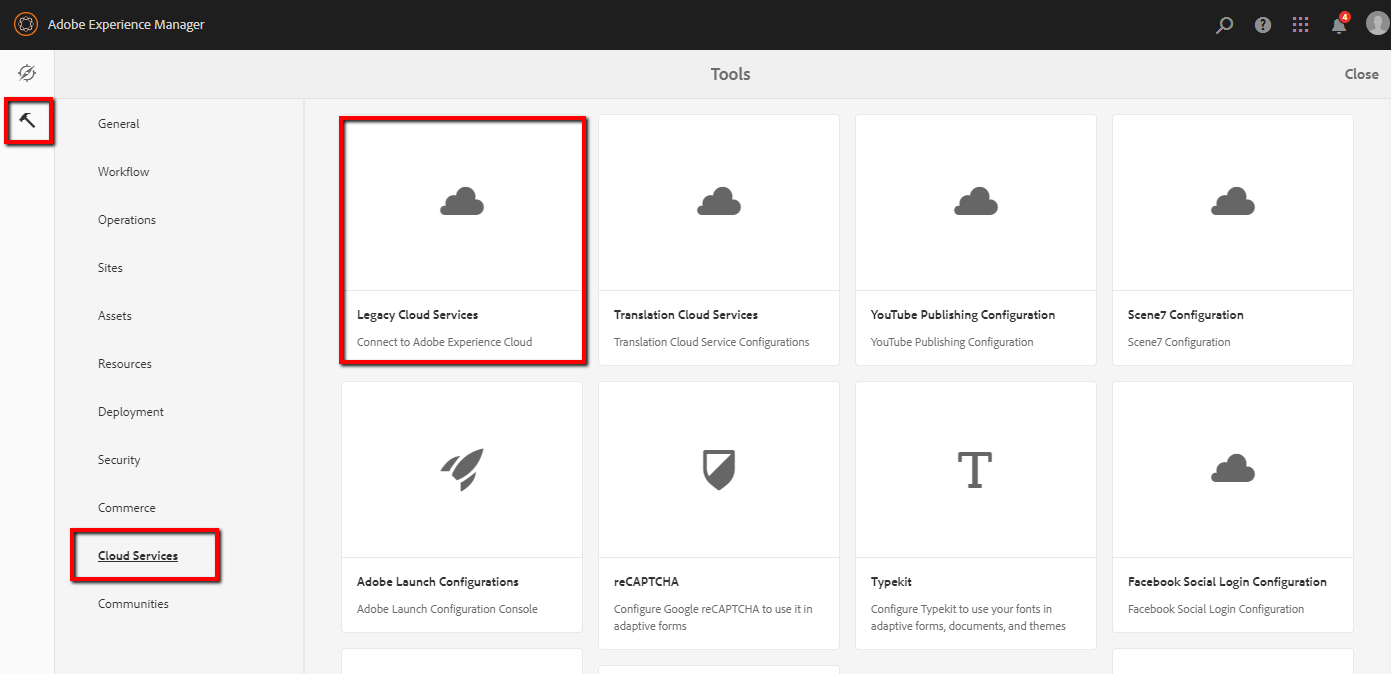
To configure the plugin, go to the Cloud Services (/libs/cq/core/content/tools/cloudservices.html) page in your AEM authoring environment or complete the following steps.
- 1) Using Touch UI, navigate to the Tools Panel > Cloud Services > Legacy Cloud Services.
- 2) Scroll down to Siteimprove Configurations> Show Configurations and click on it to expand it out.
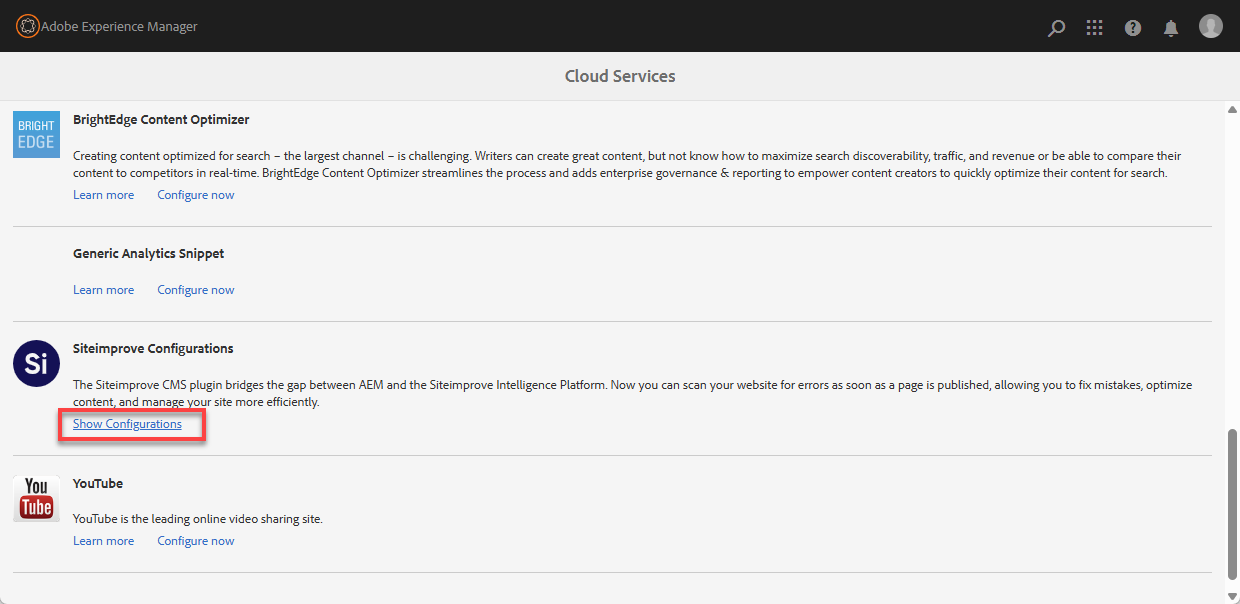
- 3) Click the plus sign next to “Available configurations [+]” to add a new configuration.

- 4) A window should pop up to create the configuration. Fill in the required fields and select the “Create” button.
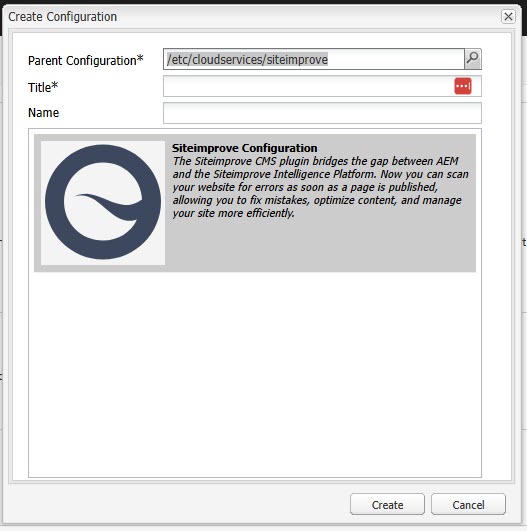
- Parent Configuration field (required) - this should autofill, and you should just leave this as it is.
- Title field (required) - Name this something that corresponds to the site you want the plugin configurations applied to. If you are setting up multiple sites, the configuration for each should have a name that corresponds to the site. This title will show up when you select the cloud configuration to be applied to certain directories under the Navigation tree.
- Name (optional) - you don’t have to fill this in.
- 4) The cloud services Siteimprove configuration area should open up so you can make changes to the configuration of the plugin. Fill out the fields and tabs per the notes and instructions below.
- 5) General Config Tab (Required)

- External Domain with protocol field (required) - This should be the domain with the protocol for the site that we are scanning in the Siteimprove platform and NOT the authoring/editing page domain. For example, https://adobeaem_int.siteimprove.com/.
- Page Extension field (optional) - the pages of the site scanned in the Siteimprove platform use an extension like “.html” or “.aspx,” then you can add that here. If no extension is used, then just leave this blank. This field can also be used to add page extensions or anything else that needs to be consistently added to the end of URLs to match the URLs being crawled in the Siteimprove platform.
- Cut from path field (optional) - Use this to cut out the parts of the CMS authoring URLs after the domain and “/editor.html” that don’t match the URLs crawled in the Siteimprove platform. As typically the URLs start with something like “https://{authordomainhere}/editor.html/content,” you will need to cut out “/content” at the very least from the URLs, so that needs to be entered here unless “/content/” is in the URLs of the published pages. You might have more than that, though, that needs to be cut out, depending on your URL structure setups. Cut from path settings are executed in the order they are defined in the multi-field, and it helps not to cut out redundant paths that contain paths already cut out.
For example, if your authoring URL is https://adobeaem_int-author.siteimprove.com/editor.html/content/we-retail/us/en/equipment and the live published page URL that corresponds to this is https://adobeaem_int.siteimprove.com/us/en/equipment. In that case, you will want to cut out “/content/we-retail" from the file path of https://adobeaem_int-author.siteimprove.com/editor.html/content/we-retail/us/en/equipment to make it https://adobeaem_int.siteimprove.com/us/en/equipment. The part of the path “/editor.html” is automatically removed, as that is the same for all editing URLs in AEM, and the authoring domain is replaced with what is entered under the “External domain with protocol” field. - Cut from path Regex field (optional) - This field can also be used if regex is required to cut out parts of the file path. The regex used for this is specifically for AEM, so you may need to consult with AEM’s documentation on the usage of Regex. The format used is <find regular expression>@<replace with>.
For example, “(/content/we-retail/us/en)(/about-us)@$2”. This will transform the page path on author “/content/we-retail/us/en/about-us” to the external path “/about-us.” In this example, “$2” corresponds to the second capture group of “(/about-us)” and the first capture group “(/content/we-retail/us/en) would correspond to “$1.” “$0” would include the whole match.
Be aware that the regular expressions are executed after the “Cut from path” cutting above it that is not Regex. So if you already shorten “/content/we-retail” the regular expression should not include “/content/we-retail” but start with “/us/en” instead. Regular expression replacements are executed in the order they are defined in the multi-field to allow sophisticated rewrite scenarios. - Custom path property field (optional) - This can be set to specify the external path of a page or a vanity path like “sling: vanityurl.” These paths can be found under the CRXDE Lite directory. You can also access CRXDE Lite from the AEM menu. From the main menu, select Tools > General > CRXDE Lite. Adobe’s documentation: Using CRXDE Lite | Adobe Experience Manager. If this property is a multi-valued one, we only take the first non-empty entry into consideration. If the property value does not exist, the plugin will fall back to the normal behavior.
- Use configured extension for custom path (optional) - Check this if you want the page extension configured above to apply to the custom path. If left unchecked, the page extension will not be added.
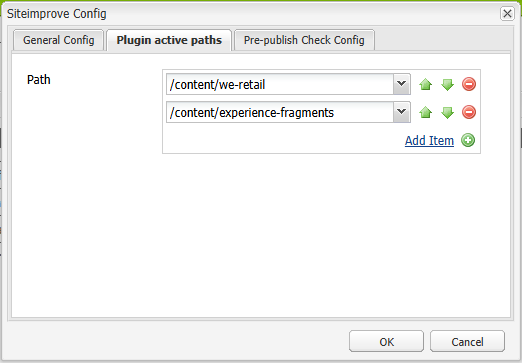
- 6) Plugin Active Paths Tab (Required) - here you need to set up the top-level directory page(s) that you want the plugin cloud configuration applied to. The cloud configurations are inherited from the top-level directory down. This also should match what is set up under the Page Properties > Cloud configurations mentioned under the Cloud Configuration setup under the Page Properties section. Both settings are typically required for the plugin to work properly and display the Prepublish check button if you are utilizing that feature. If you want to use the plugin with Experience Fragments, which is an option with the Latest Plugin Experience on version 3 and later of the plugin, you will need to add the path to them as well here, which is typically “/content/experience-fragments."
- 7) Pre-publish Check Config Tab (Optional) - This tab only needs to be configured to utilize the Prepublish Check feature of the plugin, which requires a subscription to Prepublish (Please reach out to your Customer Success Representative with Siteimprove with questions about this subscription). Do not fill out this area if you are not using this feature with the plugin or if you do not have the Prepublish subscription required setup yet. You can use the standard plugin that only shows data for pages published and scanned in the Siteimprove platform without this.
To use this feature, enter the API credentials created during the Pre-installation step (How to connect to the Siteimprove API) from the Siteimprove platform under Integrations > API > API Keys, verify the configuration with the “Verify” button, and enable Prepublish functionality using the “Enable” button. This checks against whether you have a subscription to Prepublish, which is required to use this feature, so if you do not have a subscription to Prepublish, and this is filled out and error message will appear. If you don’t have a Prepublish subscription and want to use the plugin without Prepublish, remove the API Username and Token and save the configuration.
Note: As a best practice, we recommend using a generic user for this API setup so that the connection is user-agnostic.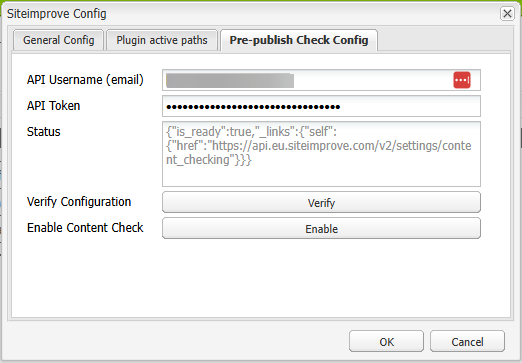
- 8) Select the ‘OK' button in the bottom right-hand corner of the configuration window to save the configurations.
Removing Configurations
To remove configurations, follow the steps below.
- In AEM, go under Tools > Operations > Configurations.
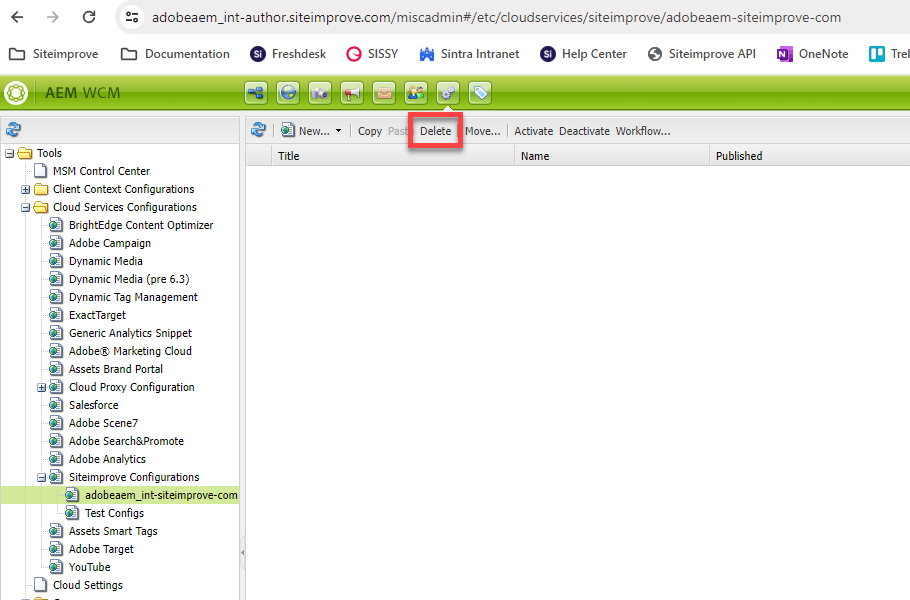
- Go under Tools > Cloud Services Configurations > Siteimprove Configurations (Or YOUR_AEM_AUTHOR_ENVIRONMENT_DOMAIN_HERE/miscadmin#/etc/cloudservices/siteimprove)
- Select the specific configuration you want to remove.
- Select the “Delete” button to delete a config.
Cloud Configuration setup under Page Properties
In addition to setting up the file path you want the configuration applied to under the “Plugin active paths” tab under the configuration step above, you also need to select the configuration you want applied to the same directory or directories under Page Properties > Cloud Configurations for the top-level page you want the configuration applied to. The configurations are inherited from the top-level directory down. To do so, follow the directions below.
- Using Touch UI, from the "Navigation Panel" in AEM select the "Sites Console."
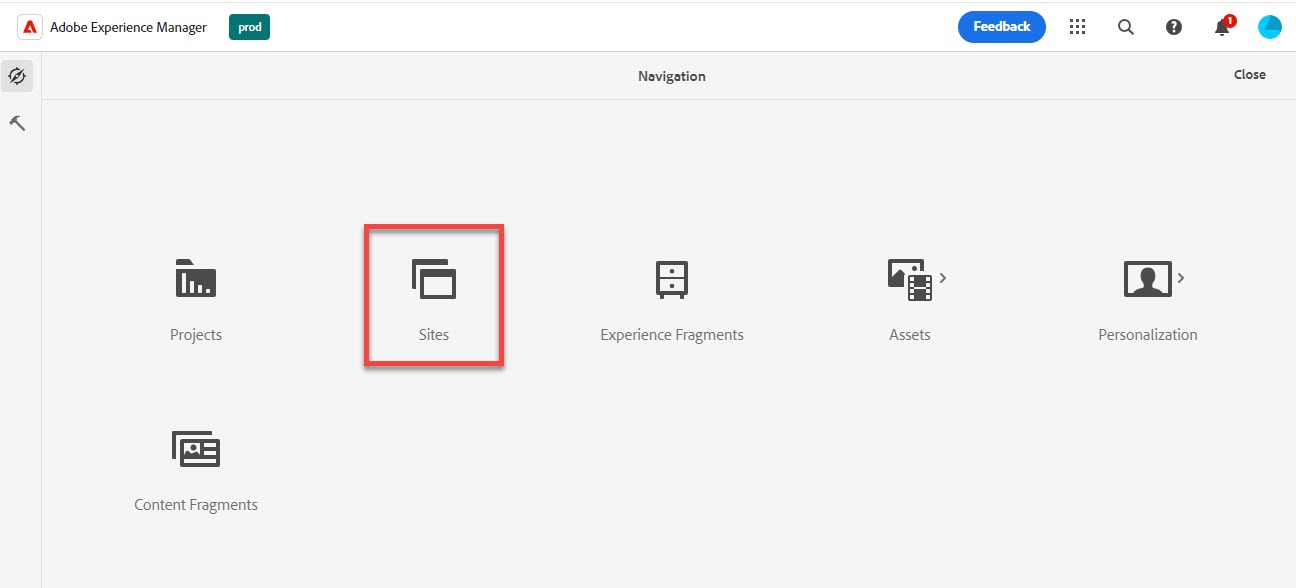
- Select the top-level or root directory page that you want to apply the particular plugin configurations setup above to, and select that page.
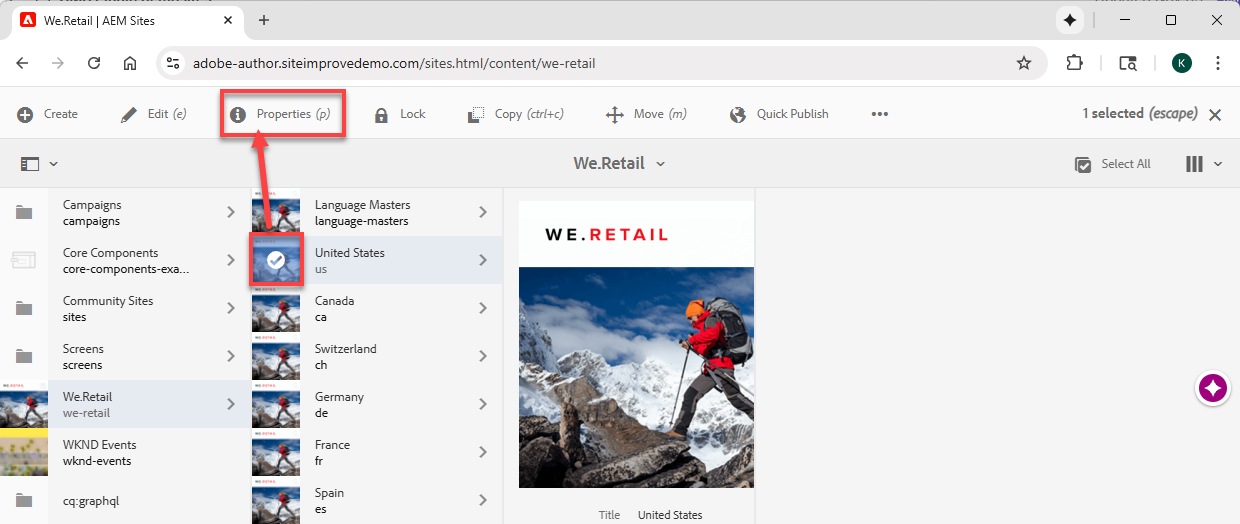
- In the page menu at the top, select "Properties."
- Under "Properties," select the "Cloud Services" tab.
- Under "Cloud Service Configurations," select "Add Configuration," and select 'Siteimprove Configurations' from the drop-down menu.
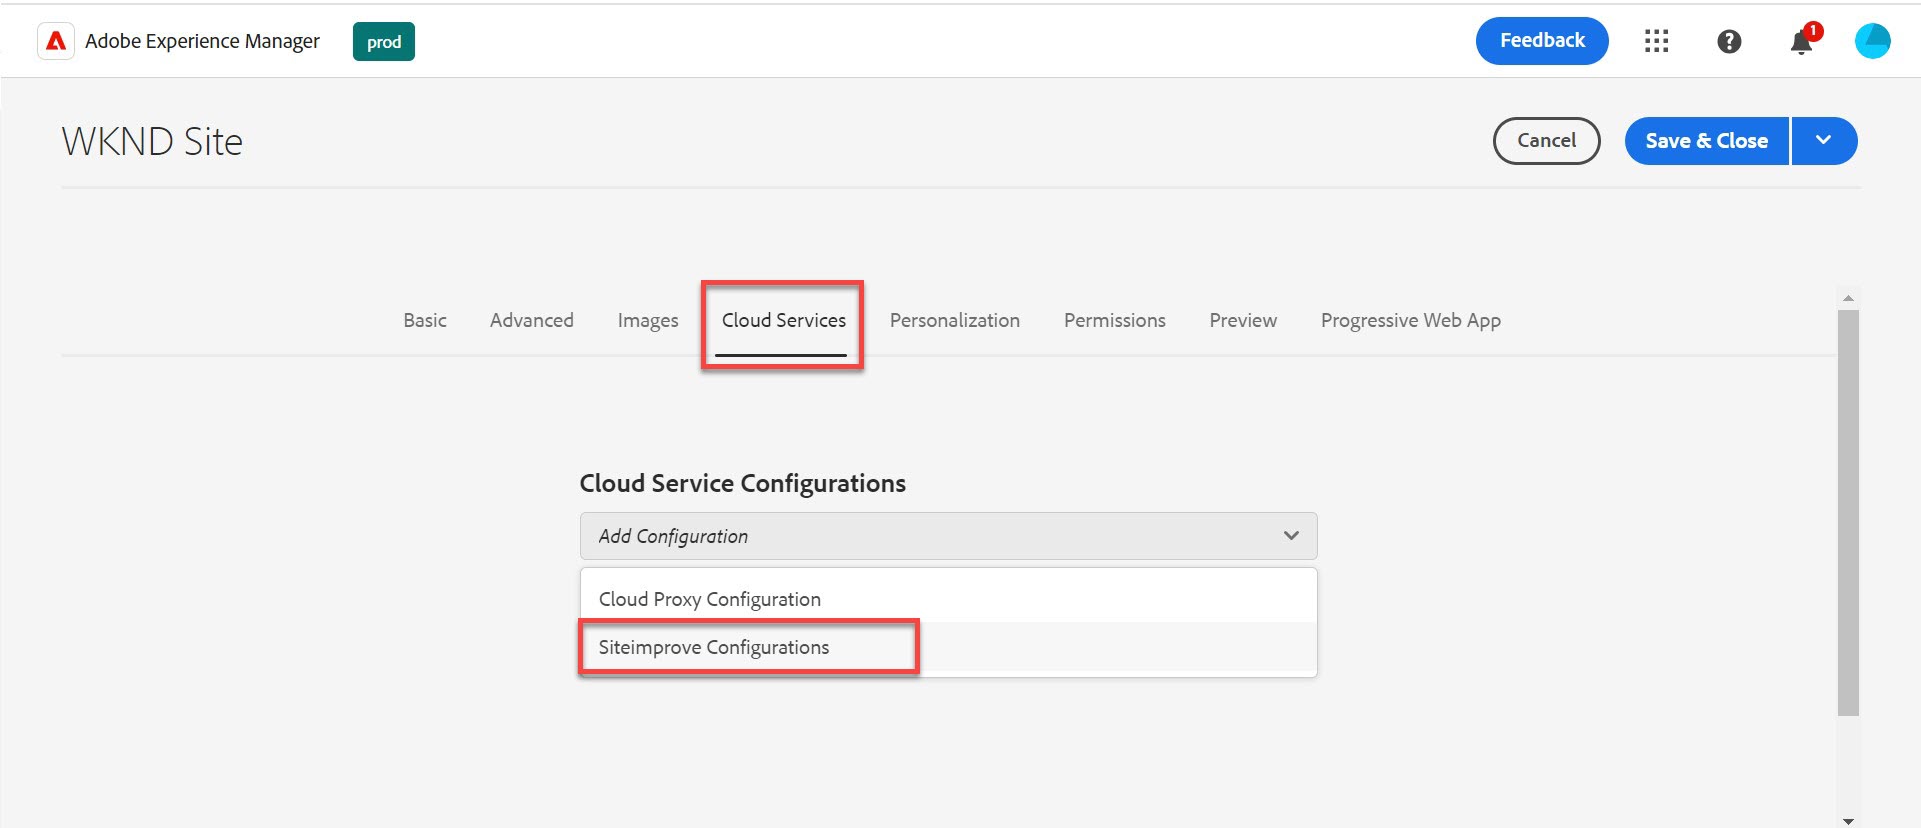
- Then select the particular Siteimprove plugin configuration you want to apply to that directory and the pages below it in the directory tree. The example in the screenshot below shows “test-config” as the name of the title of the Siteimprove configurations, but there can be more than one Siteimprove Configuration setup if there are multiple sites or multiple configurations needed.

- Then select “Save and Close” to save and apply the change.
User permissions to see the plugin
In order to see the plugin, you need to have user access to both the Siteimprove platform and the AEM CMS.
Siteimprove User Permissions required to see the plugin
Users must have an appropriate user role in Siteimprove that has access to see the plugin, and they must have access to the corresponding site, group, and area (Accessibility, QA, SEO, Policy, etc) they are trying to see data for in the plugin. Please review User Roles and Permissions for more information about user roles and permissions in the Siteimprove Platform.
AEM User Permissions required to see the plugin
In order to see the plugin, a user in AEM has to be a member of the "siteimprove-users" group. Group memberships can be assigned in User admin (/useradmin) or in Group admin (/libs/granite/security/content/groupEditor.html). The package includes a system user “siteimprove-service.” This user has privilege jcr:read on ‘/’ and jcr:write on /conf/global/settings/siteimprove.
Technical details
Affected repository paths
- /apps/siteimprove-packages
- /apps/siteimprove/plugin
- /apps/granite/ui/content/globalhead/siteimprove
- /apps/wcm/core/content/editor/jcr:content/content/items/content/header/items/headerbar/
- items/toggleContentCheck
- /apps/wcm/core/content/editor/jcr:content/content/items/content/header/items/headerbar/
- items/siteimprovePlugin
- /apps/wcm/core/content/editor/jcr:content/content/items/content/content/items/
- siteimprovecontentcheckresult
- /etc/cloudservices/siteimprove
- /conf/global/settings/siteimprove
- /conf/global/settings/workflow/models/siteimprove
- /var/workflow/models/siteimprove
- /home/users/system/siteimprove
- /home/groups/s/siteimprove
- /rep:policy
Removing old sample workflow locations, have been relocated
- /conf/global/settings/workflow/models/si-test
- /var/workflow/models/si-test
- /conf/global/settings/workflow/models/si-unpublishcheck
- /var/workflow/models/si-unpublishcheck
Limitations
The plugin overlay is only rendered in /editor.html and /cf# if there is a cloud configuration assigned to the current path or the current path matches the configured active paths.
Clientlib categories used
- siteimprove.aem
Included over /apps/siteimprove/plugin/ui/head/head.html which is included by /apps/granite/ui/content/globalhead/siteimprove globally for standard touch ui interfaces. - cq.wcm.edit
Sidekick Siteimprove action additions. - cq.authoring.editor.sites.page.hook
/editor.html Siteimprove menu additions.
Inclusion in editor.html
For making the plugin available in editor.html, an addition to the headerbar in /apps/wcm/core/content/editor/jcr:content/content/items/content/header/items/headerbar/item has been created, as including the overlay within the page will lead to issues with the AEM overlay used in edit mode.
Usage
After installing and configuring the plugin, the Siteimprove Account Owner should be the first one to log into the plugin in the CMS with their Siteimprove platform credentials and agree to the terms and conditions.
You can read the Siteimprove CMS plugin terms and conditions and also approve these terms as an Account Owner under Settings > Integrations > CMS Plugin Setup.
You should then be able to utilize the plugin if everything is installed and configured correctly. You can reference our documentation on how to use the plugin to determine if the plugin is behaving as expected. If you are running into issues and certain features are not working you please reference the Troubleshooting section below for some things you can look into to resolve some more commonly reported issues with the plugin.
Documentation on How to Use the Plugin
- How to navigate the New Siteimprove CMS Plugin - goes over how to use the plugin if you have the default “New Plugin Experience (UI)” installed with the plugin.
- How to navigate the old CMS Plugin - goes over how to navigate the plugin if you are using the “Old Plugin Experience (UI).”
Features unique to the AEM plugin
There are a couple of features that are unique to the AEM CMS Plugin that you have the option of configuring and utilizing with the AEM plugin.
Adobe Experience Fragments Prepublish checks
With version 3.0.0 of the plugin and after it, there is the option to check Adobe Experience Fragments prior to them being published if you have a subscription to the Prepublish feature (Please reach out to your Customer Success Representative with Siteimprove with questions about this subscription). You will need to ensure that the path to the Adobe Experience Fragments is set up under the “Plugin Active Paths" tab under the Plugin Configuration area to be able to utilize this feature. Typically, the path is “/content/experience-fragments."
- In the AEM Experience Fragments console, select the fragment you’d like to check and click edit.
- Click the Siteimprove icon in the fragment editor toolbar to start a Prepublish check. Note: if the plugin overlay is open, you’ll need to close it first.
AEM Prepublish Checks with the New Plugin UI
- In the AEM Sites Console, select the page you want to check and click “Edit” to open up the editing page in a new browser window.
- Click the “Run content check” button under the “Prepublish view” tab within the plugin overlay. With older versions of the plugin (before version 3.0.13), you may also be able to select the Siteimprove icon in the page editor toolbar to start a Prepublish check.
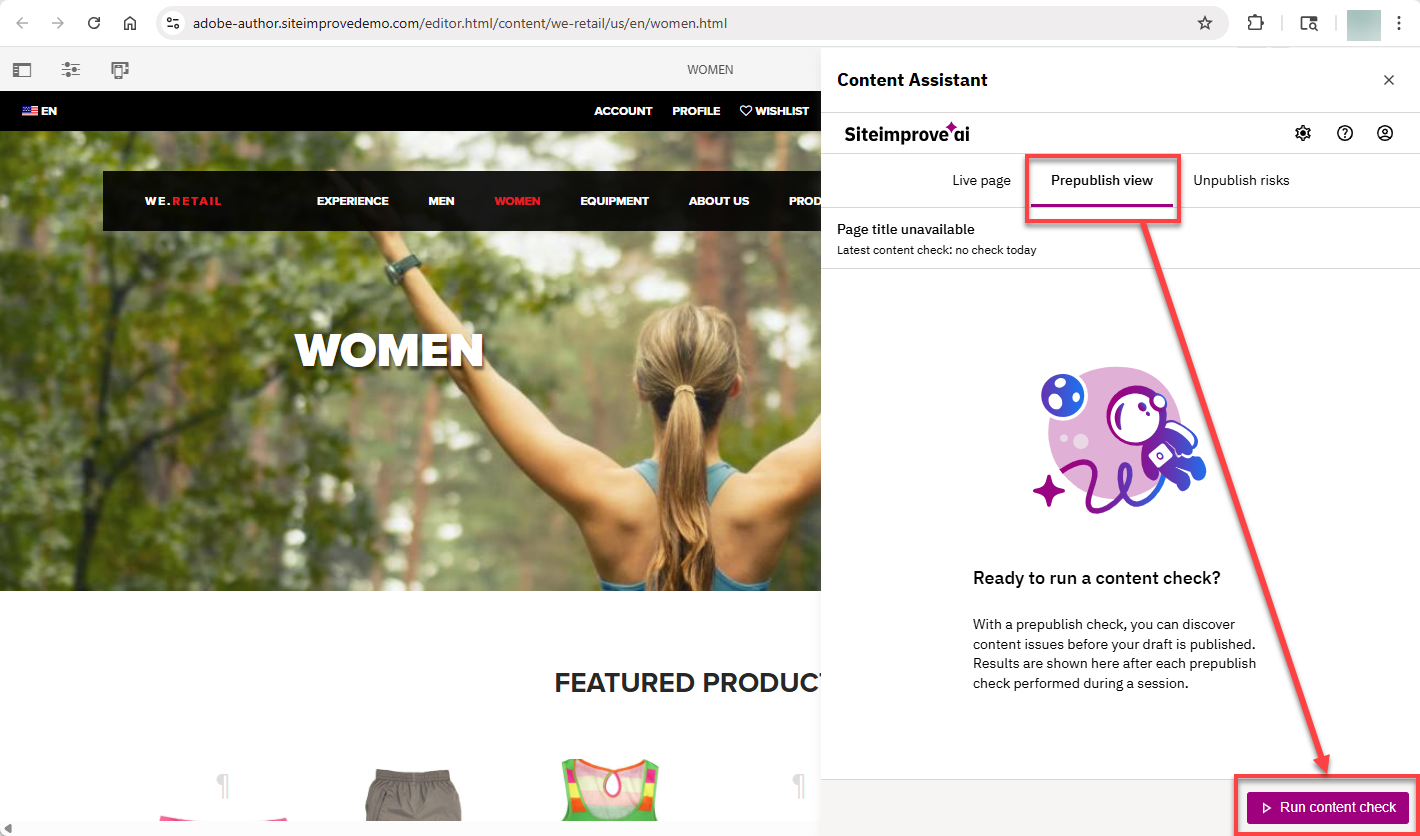
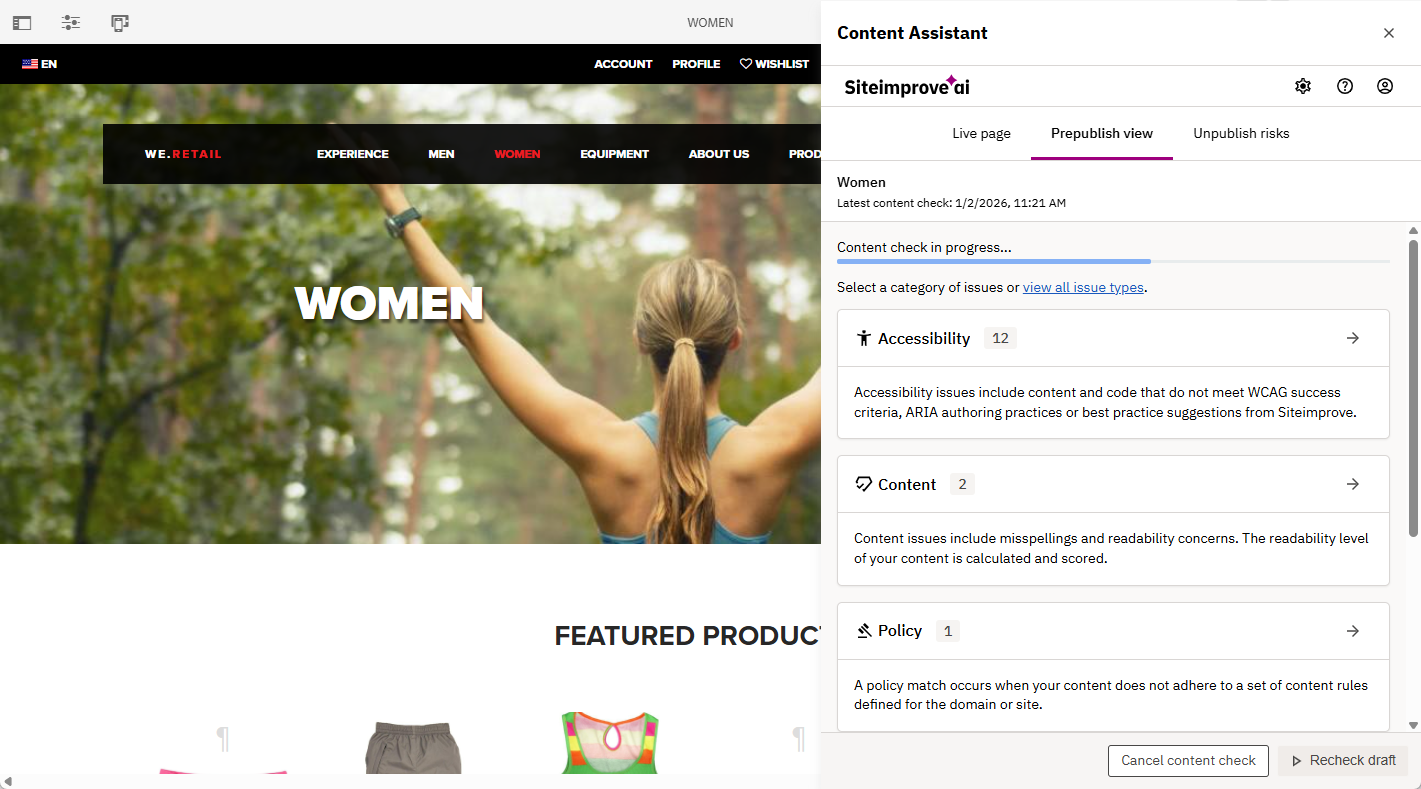
- The check should then be performed under the “Prepublish view” tab. You should be able to see a status bar appear to see the progress of the check.
AEM Prepublish Checks with the Old Plugin UI
- In the AEM Sites Console, select the page you want to check and click “Edit” to open up the editing page in a new browser window.
- Click the Siteimprove icon in the page editor toolbar to start a Prepublish check.
- A blue bar will appear showing the status of processing the Prepublish check. You have the option to wait until the check is complete to select the “See Results” button and let the checks process in the background and update under the Prepublish check view once complete, or wait for the checks to complete and select the "See Results” button.
- You can analyze all the Prepublish check results by expanding the table to see the exact issues, number of occurrences, highlighting options in AEM, and a short description about the issue.
Workflow Prepublish and Unpublish check sample flows
The Siteimprove CMS Plugin for Adobe Experience Manager (AEM) includes the ability to integrate Siteimprove checks in AEM workflows. You can notify and/or assign AEM tasks to authors in the publishing process and prevent issues from going live that are important to your site. Automating Siteimprove checks in the publishing process saves you from fixing regressions on live pages.
Please review the Adobe Experience Manager workflow integration guide for more information on how to utilize AEM workflows with this integration.
Troubleshooting
There are a few resources and steps below you can take to troubleshoot issues, but if those don’t work, please contact Siteimprove Customer Support to troubleshoot issues with the plugin.
Installation issues
Make sure that you are installing the correct and latest plugin version that corresponds to your AEM instance and that you are following the correct package installation steps for the particular environment type. For example, if your AEM environment is a cloud instance, then use the AEM Cloud Service package file and follow the cloud installation steps for the package installation portion of the plugin installation.
When using the dispatcher module for your authoring instance, please ensure to flush the following files after installation:
- No minification activated:
- /libs/cq/gui/components/authoring/editors/clientlibs/sites/page.css
- /libs/cq/gui/components/authoring/editors/clientlibs/sites/page.js
- Minification activated:
- /libs/cq/gui/components/authoring/editors/clientlibs/sites/page.min.css
- /libs/cq/gui/components/authoring/editors/clientlibs/sites/page.min.js
Issues with the Siteimprove overlay rendering in /sites.html
- Ensure that your deployments do not overwrite the following customizations added by the plugin:
- /apps/granite/ui/content/globalhead/siteimprove
- Please ensure that your AEM user is a member of the “siteimprove-users” group.
- The overlay will only render if the selected page or any of its parents has a Siteimprove cloud configuration attached. Ensure that the page you are looking at, or a parent of it, is configured under the "Plugin Active Paths" tab under the Plugin Cloud Configuration and/or that the correct Plugin Cloud Configuration is applied under Page Properties for the page or parent of the page.
Issues with the Siteimprove plugin overlay rendering for /editor.html, or the Prepublish check button is missing
- The overlay will only render if the selected page or any of its parents has a Siteimprove cloud configuration attached which is setup under the “plugin active paths” tab under the configuration and/or under Page Properties Cloud configurations as mentioned here: Cloud Configuration Setup under Page Properties and the user has the proper AEM user permissions to see the plugin mentioned here: AEM User Permissions required to see plugin.
- If you are using the dispatcher module on your authoring instance, please ensure that you follow the installation instructions for flushing the dispatcher: Flush files in the dispatcher module.
- Ensure that your deployments do not overwrite the following customizations added by the plugin:
- /apps/wcm/core/content/editor/jcr:content/content/items/content/header/items/headerbar/items/toggleContentCheck
- /apps/wcm/core/content/editor/jcr:content/content/items/content/header/items/headerbar/items/siteimprovePlugin
- /apps/wcm/core/content/editor/jcr:content/content/items/content/content/items/siteimprovecontentcheckresult
Seeing “Page not found, No Results yet, or Missing access to page” under the “This page” or “Live Page” tab
- First, ensure that you are crawling the site in the Siteimprove platform, even if it is not a production site and just a site you are testing on, or if you just plan to utilize Prepublish. We recommend that when testing the plugin, you don’t use a local version of the site, but use a non-local development environment to test the plugin on, like a Dev, Stage, QA, or UAT environment, where there is a published version (even if behind firewalls) of the site that can be crawled. The plugin requires a non-local site for some of the functionalities to work correctly. If the published version of the pages is behind firewalls and otherwise blocked from public view, typically, you can allow the IPs used by our crawler to access the site.
- If the page is not published yet or crawled in the Siteimprove platform, this is expected. If you have the Prepublish feature, you should be able to use that to check pages before being published by doing a Prepublish check. If not, you will need to publish the page to see data on it, and the page will need to be crawled in the Siteimprove platform. The page could be crawled either with a full site crawl or via Single Page Checks.
- If the page is being crawled in the Siteimprove platform, is published, and you are seeing this, there could be other issues. Steps to check into this are listed below.
- Login to the Siteimprove Platform and navigate to Quality Assurance > Inventory > Pages under the site you have installed the plugin on.
- Search for the published page URL for the editing page in the author environment where you are seeing this error coming up in the plugin. Tip: You may want to try searching different versions of the live page URLS without the domain, protocols, extension (if applicable), or trailing slash (if applicable) to see if perhaps we are crawling a different version of the URLs than you are searching for.
- If you find that we are crawling a different URL than expected, that may mean that you have to adjust the configurations in the plugin to account for that, or crawler settings may need to be adjusted to crawl the matching URLs.
- For example, if you find that we are crawling a version of the URLs that includes www in the URLs ensure that you are also including www in the “External Domain with protocol” field of the General Config tab of the plugin configuration.
- You can check to see what the CMS plugin request URLs are to help with making the correct adjustments to the crawl configurations, as the URLs requested should match what we are crawling. See CMS Plugins: CMS Plugins: How-to locate CMS ‘plugin request URLs' for more details on how to locate the request URLs. For example, if you see that the plugin request URL says “?URL=https://siteimprove.com/content/en/us/about-us” when the published page URL is actually “https://siteimprove.com/about-us”, you will want to make sure to set the “Cut from path” setting in the plugin configurations to cut out “/content/en/us” from the URLs.
- Most circumstances like this can be resolved with plugin configuration adjustments, but there are some circumstances in which crawler adjustments may be needed or done instead. If, for example, the pages render with both a trailing slash and without (without redirects), and we are crawling the version with the trailing slash and the plugin is requesting the version of the URLs without it, we could adjust the crawl settings to remove all trailing slashes from the URLs. Unfortunately, we cannot do the reverse and add trailing slashes typically, but we may have URL normalization rules we can put in place, which could help with this, and the support team can put in place.
- If the page is not being crawled, it could mean that the page is not published yet, that the page has been published but not yet crawled, or it could mean that we are not finding the page, as it is not easy to navigate to via links on the site. There are solutions for these issues listed below.
- The page is not yet published - use the Prepublish check option if you have that feature. If you don’t have the Prepublish feature, you will need to publish and crawl the page first to see data in the plugin for that page.
- The page is published, but not yet crawled. Add it as a “Single Page Check” in the Siteimprove Platform. See How do I add new pages to Siteimprove that have not been checked? (Single Page Check).
- The page is not easily found via links on the site.
- If there are a lot of pages like this, I would recommend creating a sitemap with the URLs in it and then adding that to the crawl. If the URLs are already a part of the Sitemap, you can also add that to the crawl. You may need to contact Siteimprove Customer Support to add the sitemap to the crawl.
- You can add the URLs as internal URLs under Site Content Settings. If you have a lot of URLs, we don’t recommend this, though, as adding too many URLs this way can slow down the crawls of the site. It is best to create a sitemap or page with links to the pages you need scanned to add to the crawl.
Debugging tooling in the plugin package
There is debugging tooling that is available in versions 3.0.11 and above of the plugin that can check for some things that can commonly cause issues with the plugin.
See this guide for more on that:
AEM CMS Plugin Debugging Tooling
HAR files and Plugin Request URLs
The standard Live page checks in the CMS plugin to display data for live published pages that have been checked in the Siteimprove Platform makes network requests that can be seen under the browser’s development tools under the Network tab. In order for the plugin to return data for pages, the URL in the Request URLs for live page data needs to match exactly with the URLs we are crawling in the Siteimprove Platform.
HAR files, which capture the network requests, can help the support and development team to troubleshoot why the plugin may not be working or configured properly, so the support team may request that you send them that information for some examples of editing pages you are having issues with. You can follow the article below for how to create HAR files.
You could also locate the specific request URLs under the network requests for the pages that you are having issues with and send them to support, or take a look at the request URLs to see for yourself what the issue might be. Please review the article below for more on this.
Did you find it helpful? Yes No
Send feedback