Configuring your self-managed Jira connection with OAuth 2.0
This article explains how to configure a self-managed server Jira connection, using OAuth 2.0, used to create tasks in Jira from the Siteimprove platform. This process requires configuration on both the Siteimprove platform and your Jira platform.
Before you begin
- Only Admins and Account Owners can manage the Jira connection settings from the Integrations menu in Siteimprove.
- Users with the default role cannot manage the Jira connection settings, but they can create and manage Jira issues once a connection and a shared Jira user have been set up by an Admin or Account Owner.
- This integration supports only Company-managed software (Classic) Jira project types. Team-managed software (Next-gen) project types are not supported.
- You will need administrator access to both the Siteimprove platform and your Jira instance to complete this setup.
- Siteimprove is happy to help with questions regarding configuring the integration. Siteimprove does not provide support or product help for the third-party software with which you are connecting.
To be carried out on your Jira platform
- Allow the following Siteimprove IP addresses if your Jira installation is behind a firewall:
- my2.siteimprove.com (93.160.60.51)
- id.siteimprove.com (80.62.246.63)
- connectors.siteimprove.systems (3.8.237.115)
- identity.siteimprove.com (52.223.54.229)
- identity.siteimprove.com (76.223.21.8)
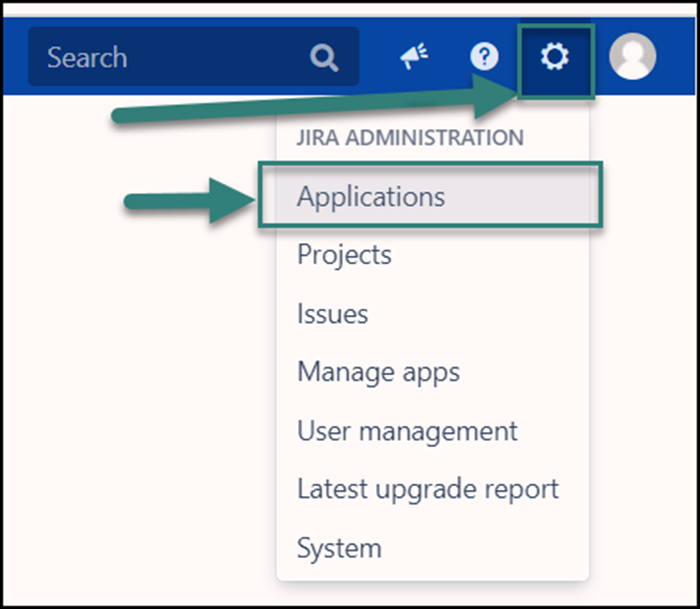
- Go to Jira administration (the cog on the top right of the menu) and click Applications.
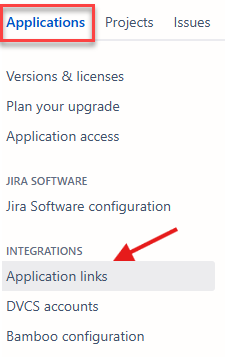
- Click Application links.
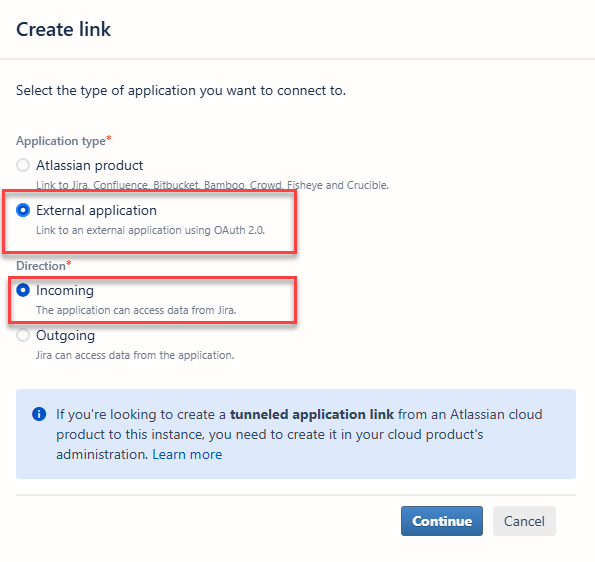
- Click Create link.

- In the Create Link modal, choose:
- Application Type: External Application
- Direction: Incoming
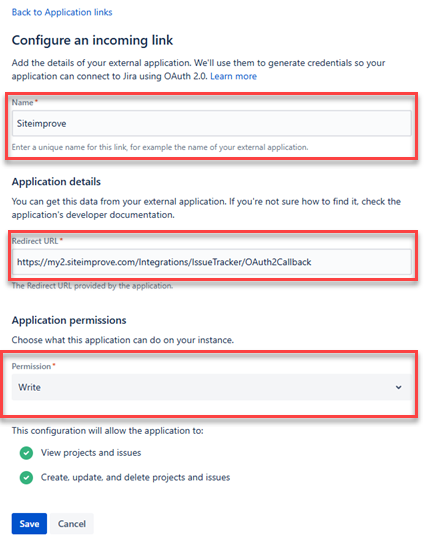
- On the Configure an incoming link page:
- Enter any Name you prefer.
- Set the Redirect URL to https://my2.siteimprove.com/Integrations/IssueTracker/OAuth2Callback.
- Set Permission to Write.
- After saving, on the Credentials page, copy the Client ID and Client Secret. You will provide these to Siteimprove to allow the platform to connect to your on‑premises Jira.
To be carried out on the Siteimprove platform
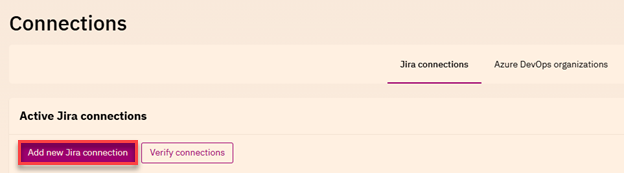
- Go to Integrations > Task Management > Connections.
- Select Connect to Jira (or Add new Jira connection for an additional connection).
- In the Create Connection modal, enter:
- A Name for your connection
- The Base URL of your Jira instance
- The Client ID and Client Secret from the Jira credentials page
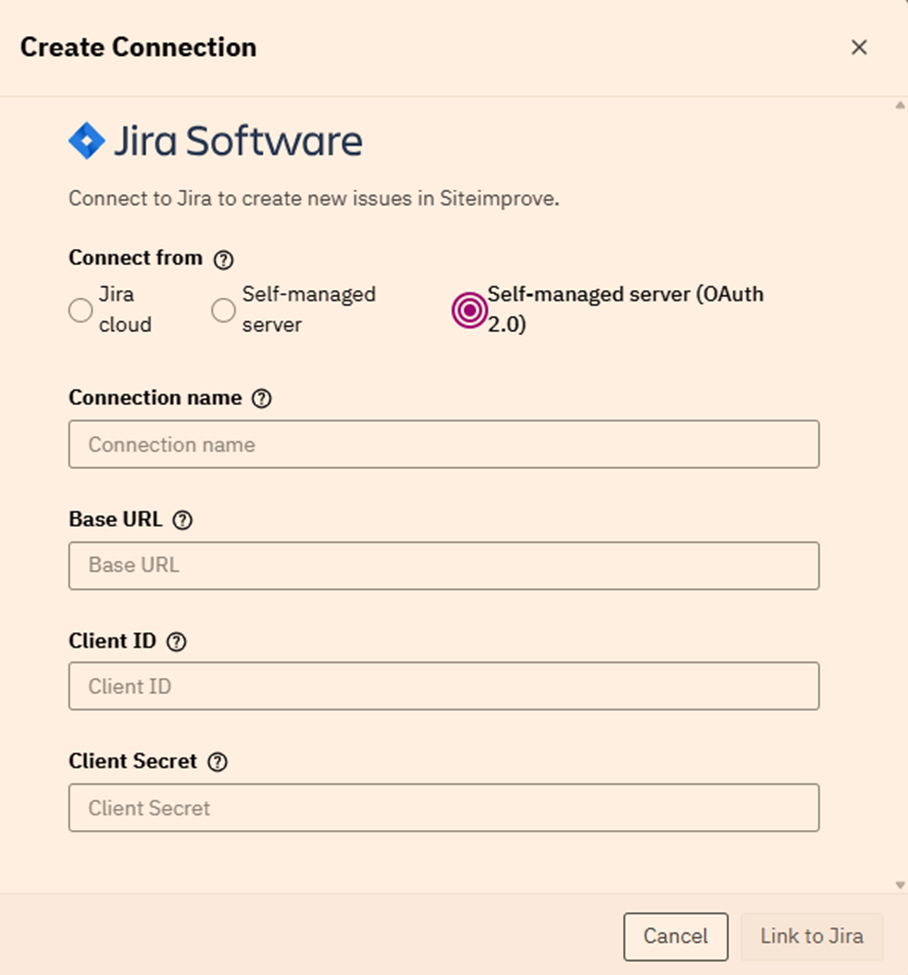
- Click Link to Jira, if the credentials are correct, a new tab opens asking you to authorize Siteimprove.
- Click Allow to create the connection.
- After the connection is created, add a field setup so you can start creating tickets directly from Siteimprove.
Troubleshooting
- Verify that the Base URL is correct and accessible from outside your network.
- Confirm that all Siteimprove IP addresses listed above have been allowed through your firewall.
- Double‑check that the Client ID and Client Secret were copied correctly from the Jira credentials page.
- Ensure the Redirect URL in Jira is exactly: https://my2.siteimprove.com/Integrations/IssueTracker/OAuth2Callback.
- Ensure the Permission in the Jira application link is set to Write.
Next steps: Configure Jira task templates
Once the Jira connection is set up, configure the Jira Projects and Issue Types (Bugs, Tasks, Epics, Story, Sub‑task, etc.) so they are available when creating Jira issues via the Siteimprove platform. Without this setup, the project fields will not appear when creating Jira issues.
- How to create, map and configure fields in a work item/task template: https://help.siteimprove.com/support/solutions/articles/80000448517
- How to create Jiras from within the Siteimprove platform: https://help.siteimprove.com/support/solutions/articles/80000863894
Did you find it helpful? Yes No
Send feedbackSorry we couldn't be helpful. Help us improve this article with your feedback.