AEM CMS Plugin Configuration Steps
Summary
Create a Siteimprove Cloud Configuration in your AEM authoring environment, set its external domain and active paths, and apply it to the same directory under Page Properties. Configure Prepublish only if you use the feature and have the required subscription. Apply configurations to the highest applicable directory so they are inherited by lower-level directories, and ensure the URLs requested by the plugin match those crawled in Siteimprove.
Instructions
The plugin uses Cloud Configurations that need to be set up and applied to the directories where you want the plugin available. There are also specific configurations to enable the Prepublish feature if you use it. Steps to configure the plugin are listed below.
The main goal of setting up plugin configurations is to make the URLs requested by the plugin under browser network requests match the URLs crawled in the Siteimprove platform. More than one plugin configuration can be added when sites under the AEM authoring environment need different setups. Apply Cloud Configurations to the highest applicable directory because configurations are inherited from higher-level directories.
Create the plugin Cloud Configuration
To configure the plugin, go to the Cloud Services page (/libs/cq/core/content/tools/cloudservices.html) in your AEM authoring environment or complete the following steps.
- Using Touch UI, navigate to Tools Panel > Cloud Services > Legacy Cloud Services.
- Scroll to Siteimprove Configurations > Show Configurations and expand it.
- Select the plus sign next to Available configurations [+].
- In the window, leave Parent Configuration as populated, enter a descriptive Title, optionally enter a Name, and select Create.
- Complete the General Config tab. Enter the External Domain with protocol. Optionally configure Page Extension, Cut from path, Cut from path Regex, Custom path property, and Use configured extension for custom path.
- Complete the Plugin Active Paths tab. Set the highest-level directories where the plugin cloud configuration should apply.
- If applicable, complete the Pre-publish Check Config tab.
- Select OK to save the configurations.
Configure Prepublish (optional)
The Pre-publish Check Config tab only needs to be configured to use the Prepublish Check feature, which requires a Prepublish subscription. Do not complete this area if you are not using the feature or do not have the required subscription.
To use this feature, enter the API credentials created during the pre-installation step, verify the configuration with the Verify button, and enable Prepublish functionality with the Enable button. As a best practice, use a generic user so the connection is user-agnostic.
Cloud Configuration setup under Page Properties
In addition to setting up the file path under the Plugin Active Paths tab, select the configuration that should apply to the same directory under Page Properties > Cloud Configurations. Configurations are inherited from the top-level directory down.
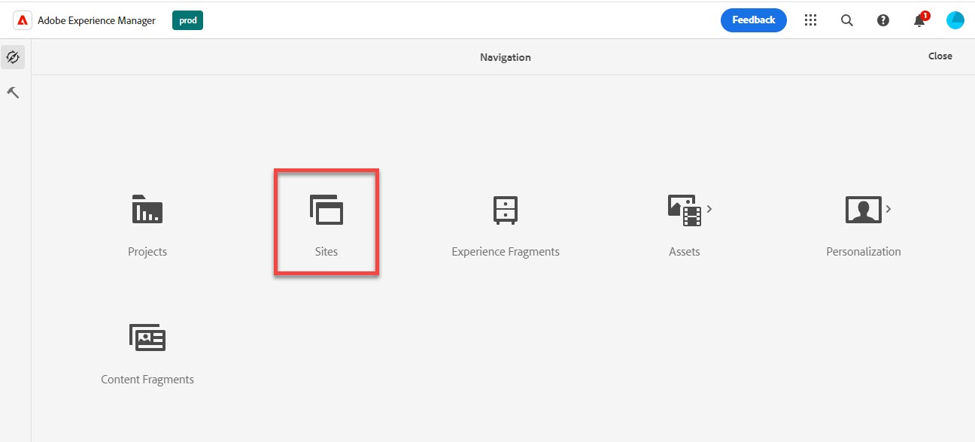
- From the Navigation Panel in AEM, select Sites.
- Select the top-level or root directory page.
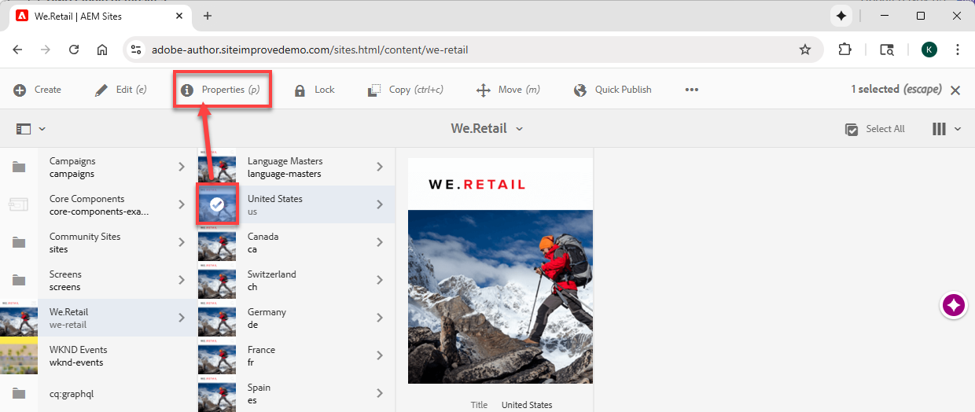
- Select Properties.
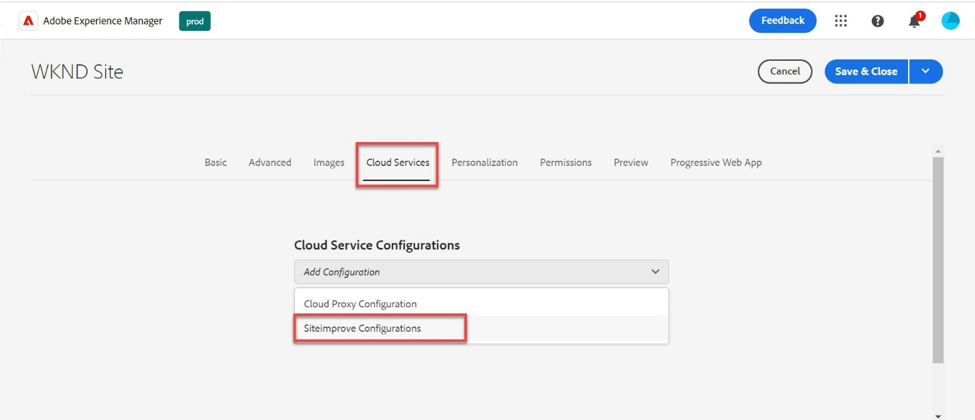
- Select the Cloud Services tab.
- Under Cloud Service Configurations, select Add Configuration > Siteimprove Configurations.
- Select the Siteimprove plugin configuration to apply.
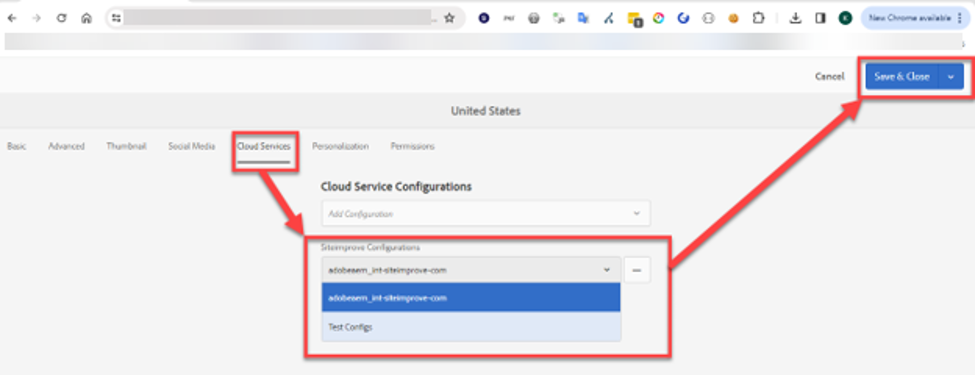
- Select Save > Close.
Removing Configurations
- In AEM, go to Tools > Operations > Configurations.
- Go to Tools > Cloud Services Configurations > Siteimprove Configurations.
- Select the configuration you want to remove.
- Select Delete.
Did you find it helpful? Yes No
Send feedback