How do I create a group using the Siteimprove sitemap?
Summary
To create a group using the sitemap, go to Quality Assurance > Inventory > Sitemap, select a folder, configure group settings, and click “Create group”.
Prerequisites
Only Administrators, Account Owners, or a custom role with the "manage groups" permission can create/edit groups.
Overview
Groups help you to manage your content within the Siteimprove platform.
The Siteimprove sitemap, which shows how your site is divided into directories and folders, can be used to easily create groups.
For more information on types of groups see What is a group?.
Steps to create a group via the sitemap
- To create a group, go to Quality Assurance > Inventory > Sitemap.
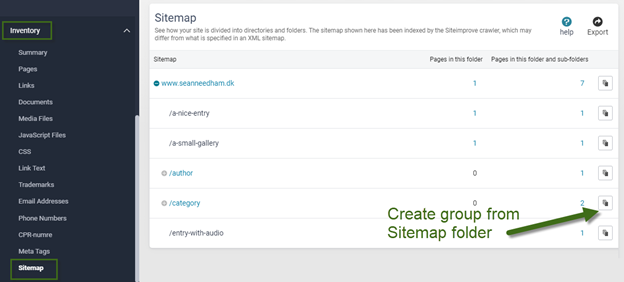
- Find the folder/directory for the group you want to create.
- Click on the Group icon to the right of the folder.
- Change the group name if required. The default name is the name of the folder.
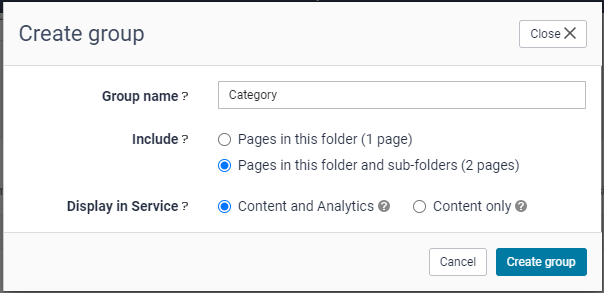
- Choose if you would like to include pages in the folder or pages in both the folder and sub-folders.
- If Siteimprove Analytics is running on the site, you can choose if the group is to be available in both "Content and Analytics" or "Content only".
- Click on the button “Create group”.
After you create the group
You will be presented with the message “Group created”. You can view the group along with other groups at Settings > Groups.
Here you can also change the access rights to the group. Further information on this is available in the article, How do I edit user access to Sites and Groups in Siteimprove?.
Interactive tutorials
How to create a group in settings*
Creating Groups via Sitemap*
In order to use the tutorials marked with an asterisk (*), you need to be an Administrator or equivalent.
Other methods of creating groups
The following articles explain other options available for creating groups:
- How do I create a group based on a URL/title match?
- How do I create a group based on an HTML content match?
Did you find it helpful? Yes No
Send feedback